var gpa = std.heap.DebugAllocator(.{}){};
const allocator = gpa.allocator();

var threaded: std.Io.Threaded = .init(allocator, .{});
const io = threaded.io();
defer threaded.deinit();
_ = io;13 Filesystem and Input/Output (IO)
In this chapter we are going to discuss how you can can execute filesystem operations and also handle input/output (IO) using the cross-platform structs and functions from the Zig Standard Library. Most of these functions and structs comes from the std.Io module.
13.1 Input/Output basics
If you have some experience in any high-level programming language, you have certainly used some input or output functionality before. In other words, you certainly have been in a situation where you needed to sent some output to the user, or, to receive an input from the user of your program.
For example, in Python we can receive some input from the user by using the input() built-in function. But we can also print (or “show”) some output to the user by using the print() built-in function. So yes, if you have programmed before in Python, you certainly have used these functions once before.
But do you know how these functions relate back to your operating system (OS)? How exactly they are interacting with the resources of your OS to receive or sent some input/output. In essence, these input/output functions from high-level languages are just abstractions over the standard output and standard input channels of your operating system.
This means that we receive an input, or send some output, through the operating system. It’s the OS that makes the bridge between the user and your program. Your program does not have a direct access to the user. It’s the OS that intermediates every message exchanged between your program and the user.
The standard output and standard input channels of your OS are commonly known as the stdout and stdin channels of your OS, respectively. In some contexts, they are also called the standard output device and the standard input device. As the name suggests, the standard output is the channel through which output flows, while the standard input is the channel in which input flows.
Furthermore, OS’s also normally create a dedicated channel for exchanging error messages, which is known as the standard error channel, or, the stderr channel. This is the channel to which error and warning messages are usually sent to. These are the messages that are normally displayed in red-like or orange-like colors into your terminal.
Normally, every OS (e.g. Windows, macOS, Linux, etc.) creates a dedicated and separate set of standard output, standard error and standard input channels for every single program (or process) that runs in your computer. This means that every program you write have a dedicated stdin, stderr and stdout that are separate from the stdin, stderr and stdout of other programs and processes that are currently running.
This is a behaviour from your OS. This does not come from the programming language that you are using. Because as I said earlier, input and output in programming languages, especially in high-level ones, are just a simple abstraction over the stdin, stderr and stdout from your current OS. That is, your OS is the intermediary between every input/output operation made in your program, regardless of the programming language that you are using.
13.2 The writer and reader pattern
In Zig, there is a pattern around input/output (IO). I (the author of this book) don’t know if there is an official name for this pattern. But here, in this book, I will call it the “writer and reader pattern”. In essence, every IO operation in Zig is made through either a Reader or a Writer object1.
These two data types are actually interfaces, and they come from the std.Io module of the Zig Standard Library. As their names suggests, a Reader is an object that offers tools to read data from “something” (or “somewhere”), while a Writer offers tools to write data into this “something”. This “something” might be different things: like a file that exists in your filesystem; or, it might be a network socket in your system2; or, a continuous stream of data, like a standard input device from your system, that might be constantly receiving new data from users, or, as another example, a live chat in a game that is constantly receiving and displaying new messages from the players of the game.
So, if you want to read data from something, or somewhere, it means that you need to use a Reader object. But if you need instead, to write data into this “something”, then, you need to use a Writer object instead. Both of these objects are normally created from a file descriptor object. More specifically, through the writer() and reader() methods of this file descriptor object. If you are not familiar with file descriptors, go to the next section.
Every Writer object has methods like print(), which allows you to write/send a formatted string (i.e., this formatted string is like a f string in Python, or, similar to the printf() C function) into the “something” (file, socket, stream, etc.) that you are using. It also has a writeAll() method, which allows you to write a string, or, an array of bytes into the “something”.
Likewise, every Reader object have methods like readSliceAll(), which allows you to read data from the “something” (file, socket, stream, etc.) until it fills a particular array (i.e., a “buffer”) object. In other words, if you provide an array object of 300 u8 values to readSliceAll(), then, this method attempts to read 300 bytes of data from the “something”, and it stores them into the array object that you have provided.
Another useful method is takeDelimiterExclusive(). In this method, you specify a “delimiter character”. The idea is that this function will attempt to read as many bytes of data as possible from the “something” until it finds the “delimiter character” that you have specified, and, it returns a slice with the data to you.
This is just a quick description of the methods present in these types of objects. But I recommend you to read the official docs, both for Writer3 and Reader4. I also think it’s a good idea to read the source code of the modules in the Zig Standard Library that defines the methods present in these objects, which are the Reader.zig5 and Writer.zig6.
13.3 The new io argument
Since Zig 0.15, the Zig development team initiated a movement to change completely how IO operations are made in Zig. With this big movement, a completely new IO interface was introduced into the language, which was the introduction of the Reader and Writer interfaces that we described on Section 13.2. Not only that has happened, but also, since Zig 0.16 a new big step into this new IO interface was made, with the introduction of the new io argument, from which you can choose the “IO backend implementation” that you want to use, with std.Io.Evented, std.Io.Threaded, and others.
Let’s make a quick comparison here. You’ve probably noticed from Chapter 3 that, allocators are an essential type of object in Zig. They appear everywhere, and they are essential to any kind of task that needs to allocate some memory to complete. Well, with the introduction of this new IO interface, choosing an “IO backend implementation” also became an essential task in Zig code, like choosing an allocator.
So now, you usually start your Zig code by choosing both an allocator, and also, an “IO backend implementation” to use. In the example below, I’m choosing an IO implementation that is based on thread pools. But I could also (if I wanted to) use std.Io.Evented, which is based on queue rings.
The key objects in this code snippet exposed below are allocator and io.
Therefore, since Zig 0.16, you will find different functions that perform some IO operation across the Zig Standard Library that takes an argument named io of type std.Io. A big example of that is the reader() method that you find in std.Io.File. This method is responsible for creating the Reader object through which you can read data from the file represented by the std.Io.File object. And this method have now, an io argument, in which you should provide the “IO backend implementation” that you want to use while reading the file.
In the example below, I’m demonstrating the use of this io argument by opening a file in my computer and reading it. Notice that I provide an “IO backend implementation” (i.e. the io object) to the reader() method. This is just one example. You will find this pattern of “providing an IO backend implementation” in many other kinds of tasks. Functions related to networking are another instance where you will commonly find this io argument.
const std = @import("std");
pub fn main(init: std.process.Init) !void {
    const cwd = std.Io.Dir.cwd();
    const file = try cwd.openFile(
        init.io, "foo.txt", .{ .mode = .read_only }
    );
    defer file.close(init.io);

    var read_buffer: [1024]u8 = undefined;
    var fr = file.reader(init.io, &read_buffer);
    var reader = &fr.interface;

    var buffer: [300]u8 = undefined;
    @memset(buffer[0..], 0);
    _ = reader.readSliceAll(buffer[0..]) catch 0;

    std.debug.print("{s}\n", .{buffer});
}
This is a line from foo.txt13.4 Using a default IO implementation
Sometimes, is just a hassle to write all the necessary code to properly instantiate a IO implementation. And sometimes, you just don’t really care much about how the IO operations are being done under the hood, and you just wish to use an IO backend with default settings. If that is your case, there are currently three easy ways to quickly get an IO backend with default settings, which are:
- use the the default IO implementation for the target configuration.
- use a single threaded IO implementation with default configuration.
- use the IO implementation from the
std.testingmodule.
13.4.1 Using the IO implementation from std.testing
As the name suggests, the IO implementation from the std.testing module should be used only inside “unit tests context”. If you try to use them inside any other type of context, you normally end up with a compilation error.
const io = std.testing.io;
_ = io;
13.4.2 Using the single threaded IO implementation
There is an easy an quick way to get a single threaded IO implementation. All you have to do is to instantiate a std.Io.Threaded object with the value .init_single_threaded, and then, call the io() method from the resulting object, as the code example below demonstrates:
var threaded: std.Io.Threaded = .init_single_threaded;
const io = threaded.io();
_ = io;
13.4.3 Using the default IO implementation for your target
In more recent versions of Zig, a new “default argument” for the main function was introduced, which is the init argument. In summary, you can write a main function that receives an object of type std.process.Init as input.
This std.process.Init object is essentially an object that comes with a set of pre-initialized APIs for your program to take advantage of. You can use this argument to easily get a pre-defined and pre-initialized IO implementation for your IO operations. This implementation is accessible at the io attribute of this init argument.
const std = @import("std");
pub fn main(init: std.process.Init) !void {
    var stdout_buffer: [1024]u8 = undefined;
    var stdout_writer = std.Io.File.stdout().writer(init.io, &stdout_buffer);
    const stdout = &stdout_writer.interface;
    _ = stdout;
}
try stdout.flush();13.5 Introducing file descriptors
A “file descriptor” object is a core component behind every IO operation that is made in any operating system (OS). Such object is an identifier for a particular input/output (IO) resource from your OS (Wikipedia 2024). It describes and identifies this particular resource. An IO resource might be:
- an existing file in your filesystem.
- an existing network socket.
- other types of stream channels.
- a pipeline (or just “pipe”) in your terminal7.
From the bullet points listed above, we know that although the term “file” is present, a “file descriptor” might describe something more than just a file. This concept of a “file descriptor” comes from the Portable Operating System Interface (POSIX) API, which is a set of standards that guide how operating systems across the world should be implemented, to maintain compatibility between them.
A file descriptor not only identifies the input/output resource that you are using to receive or send some data, but it also describes where this resource is, and also, which IO mode this resource is currently using. For example, this IO resource might be using only the “read” IO mode, which means that this resource is open to “read operations”, while “write operations” are not authorized. These IO modes are essentially the modes that you provide to the argument mode from the fopen() C function, and also, from the open() Python built-in function.
In C, a “file descriptor” is a FILE pointer, but, in Zig, a file descriptor is a File object. This data type (File) is described in the std.fs module of the Zig Standard Library. We normally don’t create a File object directly in our Zig code. Instead, we normally get such object as result when we open an IO resource. In other words, we normally ask our OS to open a particular IO resource for us, and, if the OS do open successfully this IO resource, the OS normally handles back to us a file descriptor to this particular IO resource.
So you usually get a File object by using functions and methods from the Zig Standard Library that asks the OS to open some IO resource, like the openFile() method that opens a file in the filesystem. The std.Io.net.Stream object that we have created in Section 7.4.1 is also a type of file descriptor object.
13.5.1 The standard output
You already saw across this book, how can we access and use specifically the stdout in Zig to send some output to the user. For that, we use the File.stdout() function from the std.Io module. This function returns a file descriptor that describes the stdout channel of your current OS. Through this file descriptor object, we can read from or write stuff to the stdout of our program.
Although we can read stuff recorded into the stdout channel, we normally only write to (or “print”) stuff into this channel. The reason is very similar to what we discussed at Section 7.4.3, when we were discussing what “reading from” versus “writing to” the connection object from our small HTTP Server project would mean.
When we write stuff into a channel, we are essentially sending data to the other end of this channel. In contrast, when we read stuff from this channel, we are essentially reading the data that was sent through this channel. Since the stdout is a channel to send output to the user, the key verb here is send. We want to send something to someone, and, as consequence, we want to write something into some channel.
That is why, when we access File.stdout(), most of the times, we also use the writer() method from the stdout file descriptor, to get access to a writer object that we can use to write stuff into this stdout channel. As we described in Section 13.2, this writer() method returns a Writer object, and one of the main methods of this Writer object is the print() method that we have used extensively across this book to write (or “print”) a formatted string into the stdout channel.
You should also notice in the example below, that in order to instantiate this Writer object, we must provide a reference to a buffer object as input to the writer() method. In the example below, this buffer object is stdout_buffer. By providing such buffer, we transform the IO operations performed by the Writer object into “buffered IO operations”. We are going to talk more about “buffered IO” in Section 13.6, so, don’t worry too much about that for now.
const std = @import("std");
pub fn main(init: std.process.Init) !void {
    var stdout_buffer: [1024]u8 = undefined;
    var stdout_writer = std.Io.File.stdout().writer(init.io, &stdout_buffer);
    const stdout = &stdout_writer.interface;
    try stdout.writeAll(
        "This message was written into stdout.\n"
    );
    try stdout.flush();
}
This message was written into stdout.This Writer object is like any other writer object that you would normally get from a file descriptor object. So, the same methods from a writer object that you would use while writing files to the filesystem for example, you could also use them here, from the file descriptor object of stdout, and vice-versa.
13.5.2 The standard input
You can access the standard input (i.e., stdin) in Zig by using the File.stdin() function from the std.Io module. Like its brother (File.stdout()), this function also returns a file descriptor object that describes the stdin channel of your OS.
Because we want to receive some input from the user, the key verb here becomes receive, and, as consequence, we usually want to read data from the stdin channel, instead of writing data into it. So, we normally use the reader() method of the file descriptor object returned by File.stdin(), to get access to a Reader object that we can use to read data from stdin.
In the example below, we try to read the data from the stdin with the takeDelimiterExclusive() method (which will read all the data from the stdin until it hits a new line character - '\n', in the stream), and save this data into the name object.
You should also notice that, like we did with the writer() method, we also need to provide a reference to a buffer object as input to the reader() method, when instantiating our Reader object. The reasons are exactly the same. This input buffer transforms the IO operations performed by the Reader object into “buffered IO operations”.
If you execute this program, you will notice that it stops the execution, ands start to wait indefinitely for some input from the user. In other words, you need to type your name into the terminal, and then, you press Enter to send your name to stdin. After you send your name to stdin, the program reads this input, and continues with the execution, by printing the given name to stdout. In the example below, I typed my name (Pedro) into the terminal, and then, pressed Enter.
const std = @import("std");
pub fn main(init: std.process.Init) !void {
    var stdin_buffer: [1024]u8 = undefined;
    var stdout_buffer: [1024]u8 = undefined;
    var stdout_writer = std.Io.File.stdout().writer(init.io, &stdout_buffer);
    var stdin_reader = std.Io.File.stdin().reader(init.io, &stdin_buffer);
    const stdin = &stdin_reader.interface;
    const stdout = &stdout_writer.interface;
    try stdout.writeAll("Type your name\n");
    try stdout.flush();

    const name = try stdin.takeDelimiterExclusive('\n');

    try stdout.print("Your name is: {s}\n", .{name});
    try stdout.flush();
}
Type your name
Your name is: Pedro13.5.3 The standard error
The standard error (a.k.a. the stderr) works exactly the same as stdout and stdin. You just call the File.stderr() function from the std.Io module, and you get the file descriptor to stderr. Ideally, you should write only error or warning messages to stderr, because this is the purpose of this channel.
13.6 Buffered IO
As we described in Section 13.1, input/output (IO) operations are made directly by the operating system. It’s the OS that manages the IO resource that you want to use for your IO operations. The consequence of this fact is that IO operations are heavily based on system calls (i.e., calling the operating system directly).
Just to be clear, there is nothing particularly wrong with system calls. We use them all the time on any serious codebase written in any low-level programming language. However, system calls are always orders of magnitude slower than many different types of operations.
So is perfectly fine to use a system call once in a while. But when these system calls are used often, you can clearly notice most of the time the loss of performance in your application. So, the good rule of thumb is to use a system call only when it’s needed, and also, only in infrequent situations, to reduce the number of system calls performed to a minimum.
13.6.1 Understanding how buffered IO works
Buffered IO is a strategy to achieve better performance. It’s used to reduce the number of system calls made by IO operations, and, as consequence, achieve a much higher performance. In Figure 13.1 and Figure 13.2 you can find two different diagrams which presents the difference between read operations performed in an unbuffered IO environment versus a buffered IO environment.
To give a better context to these diagrams, let’s suppose that we have a text file that contains the famous Lorem ipsum text8 in our filesystem. Let’s also suppose that these diagrams in Figure 13.1 and Figure 13.2 are showing the read operations that we are performing to read the Lorem ipsum text from this text file. The first thing you will notice when looking at these diagrams, is that in an unbuffered environment the read operations leads to many system calls. More precisely, in the diagram exposed in Figure 13.1 we get one system call per each byte that we read from the text file. On the other hand, in Figure 13.2 we have only one system call at the very beginning.
When we use a buffered IO system, at the first read operation we perform, instead of sending one single byte directly to our program, the OS first sends a chunk of bytes from the file to a buffer object (i.e., an array). This chunk of bytes are cached/stored inside this buffer object.
Therefore, from now on, for every new read operation that you perform, instead of making a new system call to ask for the next byte in the file to the OS, this read operation is redirected to the buffer object, that have this next byte already cached and ready to go.
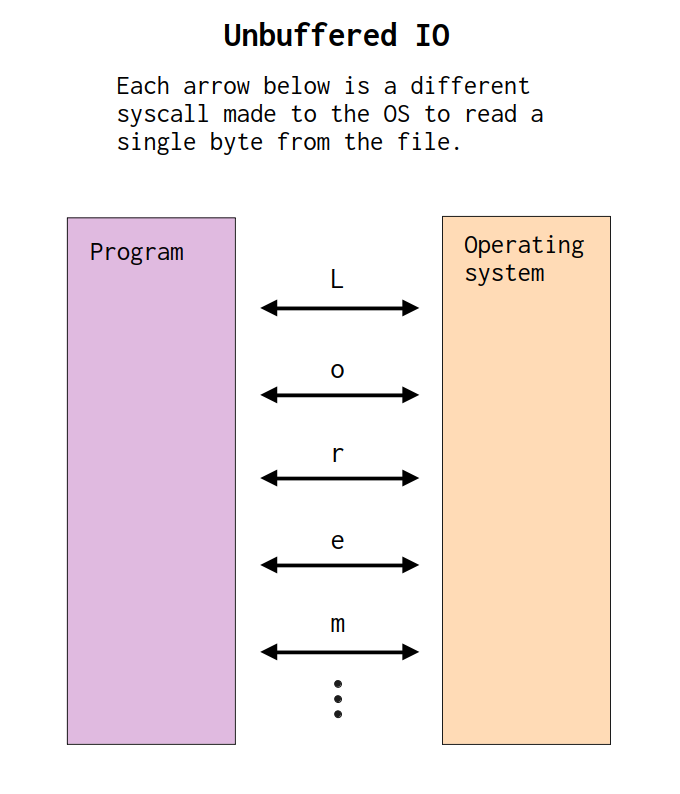

This is the basic logic behind buffered IO systems. The size of the buffer object depends on multiple factors. But it’s usually equal to the size of a full page of memory (4096 bytes). If we follow this logic, then, the OS reads the first 4096 bytes of the file and caches it into the buffer object. As long as your program does not consume all of these 4096 bytes from the buffer, you will not create new system calls.
However, as soon as you consume all of these 4096 bytes from the buffer, it means that there is no bytes left in the buffer. In this situation, a new system call is made to ask the OS to send the next 4096 bytes in the file, and once again, these bytes are cached into the buffer object, and the cycle starts once again.
Tip
In general, you should always use a buffered IO reader or a buffered IO writer object in your code. Because they deliver better performance to your IO operations.
13.6.2 Using buffered IO in Zig
Previously, IO operations in Zig were not buffered by default. However, since the new IO interface introduced in Zig 0.15, the Reader and Writer interfaces take a buffer object as input when they are instantiated, like we demonstrated in Section 13.5.1. In other words, a buffer object must be provided to instantiate a Reader or Writer object in your code. And because of that, we have buffered IO operations by default on recent versions of Zig.
If you compare it with other languages, you will notice that Zig takes a slightly different approach in it’s “buffered IO strategy”. If we take C as an example, the IO operations made through a FILE pointer in C are buffered by default. However, in C, you don’t need to explicitly pass a buffer object when instantiating such FILE pointer, because this buffer object is created behind the scenes for you, and therefore, it becomes invisible to the programmer. While in Zig, you must manually create this buffer object yourself.
So, Zig not only choose to use buffered IO, but it also choose to give the programmer full control over the buffer used in such operations. You (as the programmer) can directly control the size of this buffer, and you can also directly control how this specific buffer object is allocated in your code (i.e. you can either allocate it in the stack, or, use an Allocator object to allocate it in the heap), which fits very well with the “no hidden allocations” mantra of Zig.
Thus, if you want to use buffered IO in Zig, just make sure to pass a reference to a buffer object as input to either the writer() or reader() methods to create a Writer or Reader object that performs buffered IO operations by default.
13.6.3 Don’t forget to flush!
When you use buffered IO operations in your code, is important to not forget to flush your buffers, specially on write operations. Basically, when we are in a buffered IO scenario, and we try to write data into “something”, this data is first written into the IO buffer that we’ve provided to the Writer object as input, and this data in the IO buffer will only be effectively written into the “something” when we “commit” it. We “commit” the bytes written into the IO buffer to our target output by “flushing our IO buffer”.
So, when we flush our IO buffer, we are effectively commiting the chunk of data that is present in the IO buffer to be written into the IO resource that is described by our file descriptor object. If we don’t flush our IO buffer, then, this data never leaves the IO buffer (i.e. it never reaches the IO resource). Therefore, when you forget to flush your IO resource, what happens, most of the times, is that you don’t get any kind of output in your IO resource.
For example, if you are writing data into the stdout, and you forget to flush it, what usually happens is that you don’t get any kind of output written into the terminal. The program seems to run successfully, but you don’t get any type of visual output in the terminal to confirm it, and you get really frustrated and confused.
Thus, if you are writing data in Zig, don’t forget to flush your IO buffers by calling the flush() method of your Writer object. This will make sure that the bytes/data that you are writing are effectivelly written into the IO resource described by your file descriptor object.
Important
If you are writing data, do not forget to flush your IO buffer, by calling the flush() method of your Writer object.
13.7 Filesystem basics
Now that we have discussed the basics around Input/Output operations in Zig, we need to talk about the basics around filesystems, which is another core part of any operating system. Also, filesystems are related to input/output, because the files that we store and create in our computer are considered an IO resource, as we described in Section 13.5.
13.7.1 The concept of current working directory (CWD)
The current working directory is the folder on your computer where you are currently rooted at. In other words, it’s the folder that your program is currently looking at. Therefore, whenever you are executing a program, this program is always working with a specific folder on your computer. It’s always in this folder that the program will initially look for the files you require, and it’s also in this folder that the program will initially save all the files you ask it to save.
The working directory is determined by the folder from which you invoke your program in the terminal. In other words, if you are in the terminal of your OS, and you execute a binary file (i.e., a program) from this terminal, the folder to which your terminal is pointing at is the current working directory of your program that is being executed.
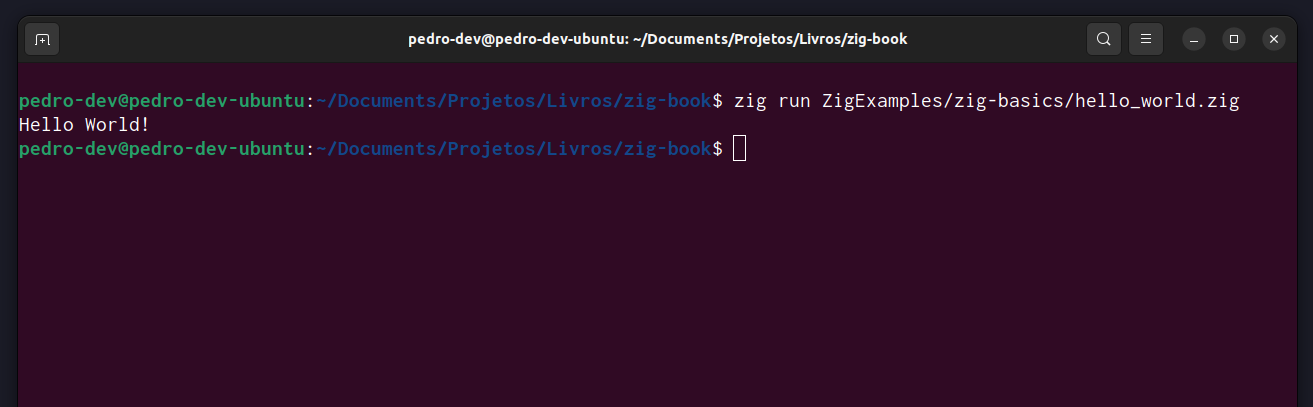
In Figure 13.3 we have an example of me executing a program from the terminal. We are executing the program outputted by the zig compiler by compiling the Zig module named hello.zig. The CWD in this case is the zig-book folder. In other words, while the hello.zig program is executing, it will be looking at the zig-book folder, and any file operation that we perform inside this program, will be using this zig-book folder as the “starting point”, or, as the “central focus”.
Just because we are rooted inside a particular folder (in the case of Figure 13.3, the zig-book folder) of our computer, it doesn’t mean that we cannot access or write resources in other locations of our computer. The current working directory (CWD) mechanism just defines where your program will look first for the files you ask for. This does not prevent you from accessing files that are located elsewhere on your computer. However, to access any file that is in a folder other than your current working directory, you must provide a path to that file or folder.
13.7.2 The concept of paths
A path is essentially a location. It points to a location in your filesystem. We use paths to describe the location of files and folders in our computer. One important aspect about paths is that they are always written inside strings, i.e., they are always provided as text values.
There are two types of paths that you can provide to any program in any OS: a relative path, or an absolute path. Absolute paths are paths that start at the root of your filesystem, and go all the way to the file name or the specific folder that you are referring to. This type of path is called absolute, because it points to an unique and absolute location on your computer. That is, there is no other existing location on your computer that corresponds to this path. It’s an unique identifier.
In Windows, an absolute path is a path that starts with a hard disk identifier (e.g. C:/Users/pedro). On the other hand, absolute paths in Linux and macOS, are paths that start with a forward slash character (e.g. /usr/local/bin). Notice that a path is composed by “segments”. Each segment is connected to each other by a slash character (\ or /). On Windows, the backward slash (\) is normally used to connect the path segments. While on Linux and macOS, the forward slash (/) is the character used to connect path segments.
A relative path is a path that start at the CWD. In other words, a relative path is “relative to the CWD”. The path used to access the hello.zig file in Figure 13.3 is an example of a relative path. This path is reproduced below. This path begins at the CWD, which in the context of Figure 13.3, is the zig-book folder, then, it goes to the ZigExamples folder, then, into zig-basics, then, to the hello.zig file.
ZigExamples/zig-basics/hello_world.zig13.7.3 Path wildcards
When providing paths, especially relative paths, you have the option of using a wildcard. There are two commonly used wildcards in paths, which are “one period” (.) and “two periods” (..). In other words, these two specific characters have special meanings when used in paths, and can be used on any operating system (Mac, Windows, Linux, etc.). That is, they are “cross platform”.
The “one period” represents an alias for the current directory. This means that the relative paths "./Course/Data/covid.csv" and "Course/Data/covid.csv" are equivalent. On the other hand, the “two periods” refers to the previous directory. For example, the path "Course/.." is equivalent to the path ".", that is, the current working directory.
Therefore, the path "Course/.." refers to the folder before the Course folder. As another example, the path "src/writexml/../xml.cpp" refers to the file xml.cpp that is inside the folder before the writexml folder, which in this example is the src folder. Therefore, this path is equivalent to "src/xml.cpp".
13.8 The CWD handler
In Zig, filesystem operations are usually made through a directory handler object. A directory handler in Zig is an object of type std.Io.Dir, which is an object that describes a particular folder in the filesystem of our computer. You normally create a Dir object, by calling the std.Io.Dir.cwd() function. This function returns a Dir object that points to (or, that describes) the current working directory (CWD).
Through this Dir object, you can create new files, or modify, or read existing ones that are inside your CWD. In other words, a Dir object is the main entrypoint in Zig to perform multiple types of filesystem operations. In the example below, we are creating this Dir object, and storing it inside the cwd object. Although we are not using this object at this code example, we are going to use it a lot over the next examples.
const cwd = std.Io.Dir.cwd();
_ = cwd;
13.9 File operations
13.9.1 Creating files
We create new files by using the createFile() method from the Dir object. Just provide the name of the file that you want to create, and this function will do the necessary steps to create such file. You can also provide a relative path to this function, and it will create the file by following this path, which is relative to the CWD.
This function might return an error, so, you should use try, catch, or any of the other methods presented in Chapter 10 to handle the possible error. But if everything goes well, this createFile() method returns a file descriptor object (i.e., a File object) as result, through which you can add content to the file with the IO operations that I presented before.
Take this code example below. In this example, we are creating a new text file named foo.txt. If the function createFile() succeeds, the object named file will contain a file descriptor object, which we can use to write (or add) new content to the file, like we do in this example, by using a buffered writer object to write a new line of text to the file.
Now, a quick note, when we create a file descriptor object in C, by using a C function like fopen(), we must always close the file at the end of our program, or, as soon as we complete all operations that we wanted to perform on the file. In Zig, this is no different. So everytime we create a new file, this file remains “open”, waiting for some operation to be performed. As soon as we are done with it, we always have to close this file, to free the resources associated with it. In Zig, we do this by calling the method close() from the file descriptor object.
const std = @import("std");
pub fn main(init: std.process.Init) !void {
    const cwd = std.Io.Dir.cwd();
    const file = try cwd.createFile(
        init.io, "foo.txt", .{}
    );
    // Don't forget to close the file at the end.
    defer file.close(init.io);
    // Do things with the file ...
    _ = try file.writePositionalAll(
        init.io, "Writing this line to the file\n", 0
    );
}
So, in this example we not only have created a file into the filesystem, but we also wrote some data into this file, using the file descriptor object returned by createFile(). If the file that you are trying to create already exists in your filesystem, this createFile() call will overwrite the contents of the file, or, in other words, it will in erase all the contents of the existing file.
If you don’t want this to happen, meaning, that you don’t want to overwrite the contents of the existing file, but you want to write data to this file anyway (i.e., you want to append data to the file), you should use the openFile() method from the Dir object.
Another important aspect about createFile() is that this method creates a file that is not open to read operations by default. It means that you cannot read this file. You are not allowed to. So for example, you might want to write some stuff into this file at the beginning of the execution of your program. Then, at a future point in your program you might need to read what you wrote in this file. If you try to read data from this file, you will likely get a NotOpenForReading error as result.
But how can you overcome this barrier? How can you create a file that is open to read operations? All you have to do, is to set the read flag to true in the third argument of createFile(). When you set this flag to true, then the file gets create with “read permissions”, and, as consequence, a program like this one below becomes valid:
const std = @import("std");
pub fn main(init: std.process.Init) !void {
    const cwd = std.Io.Dir.cwd();
    const file = try cwd.createFile(init.io, "foo.txt", .{ .read = true });
    defer file.close(init.io);
    _ = try file.writePositionalAll(
        init.io, "We are going to read this line", 0
    );

    var buffer: [300]u8 = undefined;
    @memset(buffer[0..], 0);

    var read_buffer: [1024]u8 = undefined;
    var fr = file.reader(init.io, &read_buffer);
    var reader = &fr.interface;

    _ = reader.readSliceAll(buffer[0..]) catch 0;

    std.debug.print("What we read from the file: {s}\n", .{buffer});
}
What we read from the file: We are going to read this line13.9.2 Opening files and appending data to it
Opening files is easy. Just use the openFile() method instead of createFile(). In the first argument of openFile() you provide the IO implementation, then, on the second argument you provide the path to the file that you want to open, then, on the third argument you provide the flags (or, the options) that dictates how the file is opened.
You can see the full list of options for openFile() by visiting the documentation for OpenFlags9. But the main flag that you will most certainly use is the mode flag. This flag specifies the IO mode that the file will be using when it gets opened. There are three IO modes, or, three values that you can provide to this flag, which are:
read_only, allows only read operations on the file. All write operations are blocked.write_only, allows only write operations on the file. All read operations are blocked.read_write, allows both write and read operations on the file.
These modes are similar to the modes that you provide to the mode argument of the open() Python built-in function10, or, the mode argument of the fopen() C function11.
In the code example below, we are opening the foo.txt text file with a write_only mode, and appending a new line of text to the end of the file. To do that, we use the writePositionalAll() method from the file descriptor object. This method allows you to write a slice of bytes/data into a specific position in the file.
Since we want to append data to the end of the file, I use the length() method of the file descriptor object to calculate the length of the file (i.e. how many bytes the file contains), and then, I pass the result on the third argument of this writePositionalAll() method, which tells this method to write the input data at the end of the file.
const std = @import("std");
pub fn main(init: std.process.Init) !void {
    const cwd = std.Io.Dir.cwd();
    const file = try cwd.openFile(init.io, "foo.txt", .{ .mode = .write_only });
    defer file.close(init.io);

    const length = try file.length(init.io);
    _ = try file.writePositionalAll(
        init.io, "Some random text to write\n", length
    );
}
13.9.3 Deleting files
Sometimes, we just need to delete/remove the files that we have. To do that, we use the deleteFile() method. You just provide an IO implementation in the first argument, and the path of the file that you want to delete in the second argument, and this method will try to delete the file located at this path.
const cwd = std.Io.Dir.cwd();
try cwd.deleteFile(init.io, "foo.txt");
13.9.4 Copying files
To copy existing files, we use the copyFile() method. The first argument in this method is the path to the file that you want to copy. The second argument is a Dir object, i.e., a directory handler, more specifically, a Dir object that points to the folder in your computer where you want to copy the file to. The third argument is the new path of the file, or, in other words, the new location of the file. The fourth argument is the IO implementation that you want to use. And the fifth argument are the options (or flags) to be used in the copy operation.
The Dir object that you provide as input to this method will be used to copy the file to the new location. You may create this Dir object before calling the copyFile() method. Maybe you are planning to copy the file to a completely different location in your computer, so it might be worth to create a directory handler to that location. But if you are copying the file to a subfolder of your CWD, then, you can just simply pass the CWD handler to this argument.
const cwd = std.Io.Dir.cwd();
try cwd.copyFile(
    "foo.txt",
    cwd,
    "ZigExamples/file-io/foo.txt",
    init.io,
    .{}
);
13.9.5 Read the docs!
There are some other useful methods for file operations available at Dir objects, such as the writeFile() method, but I recommend you to read the docs for the Dir type12 to explore the other available methods, since I already talked too much about them.
13.10 Directory operations
13.10.1 Iterating through the files in a directory
One of the most classic tasks related to filesystem is to be able to iterate through the existing files in a directory. To iterate over the files in a directory, we need to create an iterator object.
You can produce such iterator object by using either the iterate() or walk() methods of a Dir object. Both methods return an iterator object as output, which you can advance by using the next() method. The difference between these methods, is that iterate() returns a non-recursive iterator, while walk() does. It means that the iterator returned by walk() will not only iterate through the files available in the current directory, but also, through the files from any subdirectory found inside the current directory.
In the example below, we are displaying the names of the files stored inside the directory ZigExamples/file-io. Notice that we had to open this directory through the openDir() function. Also notice that we provided the flag iterate in the second argument of openDir(). This flag is important, because without this flag, we would not be allowed to iterate through the files in this directory.
const cwd = std.Io.Dir.cwd();
const dir = try cwd.openDir(
    init.io,
    "ZigExamples/file-io/",
    .{ .iterate = true }
);
var it = dir.iterate();
while (try it.next(init.io)) |entry| {
    try stdout.print(
        "File name: {s}\n",
        .{entry.name}
    );
}
try stdout.flush();
File name: create_file_and_write_toit.zig
File name: create_file.zig
File name: lorem.txt
File name: iterate.zig
File name: delete_file.zig
File name: append_to_file.zig
File name: user_input.zig
File name: foo.txt
File name: create_file_and_read.zig
File name: buff_io.zig
File name: copy_file.zig13.10.2 Creating new directories
There are two methods that are important when it comes to creating directories, which are createDir() and createDirPath(). The difference between these two methods is that createDir() can only create one single directory in the current directory in each call, while createDirPath() is capable of recursively create subdirectories in the same call.
This is why the name of this method is “make path”. It will create as many subdirectories as necessary to create the path that you provided as input. So, if you provide the path "sub1/sub2/sub3" as input to this method, it will create three different subdirectories, sub1, sub2 and sub3, within the same function call. In contrast, if you provided such path as input to createDir(), you would likely get an error as result, since this method can only create a single subdirectory.
const cwd = std.Io.Dir.cwd();
try cwd.createDir(init.io, "src", .default_dir);
try cwd.createDirPath(init.io, "src/decoders/jpg/");
13.10.3 Deleting directories
To delete a directory, just provide the path to the directory that you want to delete as input to the deleteDir() method from a Dir object. In the example below, we are deleting the src directory that we have just created in the previous example.
const cwd = std.Io.Dir.cwd();
try cwd.deleteDir(init.io, "src");
13.11 Conclusion
In this chapter, I have described how to perform in Zig the most common filesystem and IO operations. But you might feel the lack of some other, less common, operation in this chapter, such as: how to rename files, or how to open a directory, or how to create symbolic links, or how to use access() to test if a particular path exists in your computer. But for all of these less common tasks, I recommend you to read the documentation of the Dir type13 , since you can find a good description of these cases there.
Previously, these objects were known as the
GenericReaderandGenericWriterobjects. But both of these types were deprecated in 0.15.↩︎The socket objects that we have created in Section 7.4.1, are examples of network sockets.↩︎
https://ziglang.org/documentation/master/std/#std.Io.Writer.↩︎
https://ziglang.org/documentation/master/std/#std.Io.Reader.↩︎
https://codeberg.org/ziglang/zig/src/branch/master/lib/std/Io/Reader.zig.↩︎
https://codeberg.org/ziglang/zig/src/branch/master/lib/std/Io/Writer.zig.↩︎
A pipeline is a mechanism for inter-process communication, or, inter-process IO. You could also interpret a pipeline as a “set of processes that are chained together, through the standard input/output devices of the system”. At Linux for example, a pipeline is created inside a terminal, by connecting two or more terminal commands with the “pipe” character (
|).↩︎https://ziglang.org/documentation/master/std/#std.Io.File.OpenFlags↩︎
https://docs.python.org/3/tutorial/inputoutput.html#reading-and-writing-files↩︎
https://www.tutorialspoint.com/c_standard_library/c_function_fopen.htm↩︎